Overview
There are three methods you can use to transfer inventory internally.
- Instant: inventory is instantly moved from the origin to the destination location lightning fast
- Split - Adjustment: Inventory will be instantly adjusted in at the origin and a draft Inventory Adjustment will be created for the destination that can be executed later.
- Split - Location: Inventory will instantly be moved to a holding location and a draft Inventory Transfer will be created between the holding and destination location that can executed later.
Why different methods
We made Lighting to help you transfer inventory fast, like really fast.
When you transfer inventory between locations it is moved instantly. However, we found that some merchants wanted our lightning-fast features (like scanning) but occasionally did not want the inventory to appear in the destination location straight away.
For example: Alice runs two physical locations that both fulfill online orders. When she moves inventory between them it can take some time for her to travel from one location to the other. With an instant transfer the inventory levels were adjusted before she arrived at the destination location. This meant for a period of time inventory levels were incorrect. But, with a split transfer she can instantly reduce the inventory origin store and increase the inventory at the destination when she arrives.
Understanding the methods
Instant transfers
The original transfer method. When you make an instant transfer inventory is instantly reduced at the origin location and increased at the destination location.
Pros:
- Inventory is instantly transferred
- No need to execute a second transfer later
Cons:
- Does not accommodate inventory that spends time "in transit"
Split - Adjustment transfers
Your Inventory Transfer is automatically split into two Inventory Adjustments.
- Origin - an Inventory Adjustment is created and inventory levels are instantly reduced at the origin location.
- Destination (draft) - A draft Inventory Adjustment is generated that you can create when you are ready.
Pros:
- Instantly reduces inventory at the origin.
- Allows inventory to be increased at the destination when you are ready.
- Does not require an additional location.
Cons:
- The inventory cannot easily be seen by staff.
Split - Location transfers
Your Inventory Transfer is split into two transfers where your inventory is transferred to a holding location and back out again.
Two Inventory Transfers are created:
- Origin > Holding Location - The inventory is instantly transferred from the origin location to the holding location.
- Holding Location > Destination - A draft Inventory Transfer is generated that moves the inventory from the holding location to the destination location. This transfer can be created when you are ready for the inventory to appear at the destination.
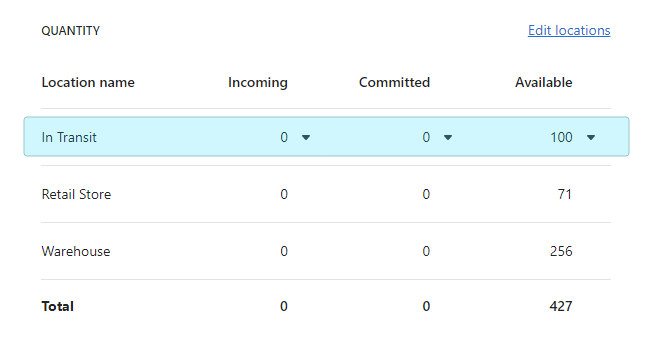
The benefit of this method is staff have visibility of inventory that is in the "holding location". As you can see from the image below this store has a holding location called "In Transit". Staff of this store can see that 100 units of this item are currently travelling between stores.
You can choose a default location to use on the settings page.
Pros:
- Instantly reduces inventory at the origin.
- Allows inventory to be increased at the destination when you are ready.
- Staff have visibility of inventory that is moving
Cons:
- Requires a spare to be setup as a "holding location"
Why can't I show inventory as Incoming
Unfortunately, Shopify has not made this available. We would love to see this feature but currently it is only possible to show inventory as "incoming" when you manually create transfers from with Shopify Admin. We hope that one day they will change their mind and allow us to show inventory as incoming.